Forgive me for slacking in this area, but honestly...who doesn't HATE to think dieting and weight loss. Those are like dirty naughty words! But, the fact is, its something we have to think about when thinking about staying healthy, or in my case, getting healthy. I had a rocky start at first. I wrote my last weight loss post just before Halloween, and after the festivities and then going on a camping trip with friends followed by more Halloween festivities.....lets just say I may or may not have eaten more than my share of Almond Joys......but there is no proof. Long story short, I didn't stick to the goals I had set for my self. My intentions were to stay on track with my diet and blog about it weekly. Well, yeah, that didn't happen. So, I'm going to call this week one. Give it another try. See how it goes this time. I actually started "officially" dieting early last week. I am down 4 pounds from my starting weight. My plan, now don't hold me to it, but my plan is to post at the end of each week. So this blog is recapping week 1. I really do want to stay on target. My thoughts are not on "looking" a certain way, or weighing a specific amount. My main focus right now is on what I'm putting into my body and becoming more active. Ive noticed that if I find things I can do with my daughter then that helps me to stay a little more motivated. Wish me luck! I would say week 1 was overall a success! Lets just keep it on through week two and go from there lol. Have a great day everyone!
Starting weight - 208
Today's loss - 4
Today's weight = 204!! WooHoo!!

Tuesday, November 13, 2012
Monday, November 12, 2012
Thanksgiving Binder
This is a little late, but better late than never right?! I was hoping to have this posted by last week but I got caught up with the usual chaos around our household and just couldn't get enough time to sit down and tackle this post. So, lets get started!
If I haven't mentioned already, I'm a HUGE YouTube geek! Secret confession, dont judge me! I love watching other YouTuber's videos over house organization, mommy bloggers, couponers, make-up tips, pretty much anything. You would be amazed what information you can find on YouTube. For me, I feel like I get a better understanding when I can visually see someone explain how to do something. One of my favorite "YouTuber's" is a lady named Jennifer Ross and she has three channels: Organizedlikejen, Myhousewifelife, and Winniethetzutube. She can be a little much at first. If you don't like bubbly, bouncy, happy attitudes then she isn't for you. However, since I'm pretty much that way myself, then I was attracted to her channels and just love her! She is VERY type A and that's exactly what I like about her channel. She gives so many simple yet great ways to get organized while also being extremely possitive and happy about the littlest things in life! (She is also a huge disney freak, which was a bonus for me lol) Early last week she showed how she organized her Thanksgiving Binder. I host Thanksgiving at our house, this being my 3rd year, and as soon as I saw this video, I knew I had to make one right away!! That very day after watching her video, I headed out and bought the supplies needed and put it together. This binder is almost EXACTLY like the one she made, so I can not take credit for the idea or design. I can, however, pass this tip on to you and maybe its something that can help you out as well!
Lets start with the Binder itself. I bought a 1 inch Avery brand binder from Staples. I also purchased some Avery 5 tab pocketed dividers and some page protectors. All the supplies I purchased, including the pocket that I will show you later, cost me just over $15. Not bad!
For starters, I put a simple cover page on the front. I also put on on the side, but didn't get a picture of that. I do hope to have prettier cover page at some point, but that may have to wait until next year. This will work for now :-)

Next, when you open the binder, it starts off with my first tab, Guest list. Now, why have a guest list you ask? Well, I'm sure most of you are like me and there are many family and/or friends that you would like to consider when thinking about who to invite. Here, I like to list EVERYONE that I will and could invite. Then, as they RSVP yes or no, I can then put a check mark or a "Y" or "N" next to their name and then about a week or so before I can put a final head count number at the bottom of the page. That way, I know how many people to consider when figuring up a setting chart as well as making sure I have enough food and beverage for everyone.


The next tab is for my menu. There are TONS of food that we make every year and I have been in the kitchen, food is being served and someone says something like "Where is the Gravy??". Talk about having that "OH CRAP" feeling! I like to have my menu items all listed out so that I can have easy access to them and double check regularly that I have made or am in the process of making everything I intended on making.


The 3rd tab is for my Shopping list and To-Do lists. I'm a HUGE list maker so this gives me a place to keep them organized. I hate writing a list, losing it, and then having to rewrite it only to possibly forget something. I also made a Master Grocery shopping list. I took into consideration the usual items I will more than likely buy every year and typed it up. Just so I don't forget any of the important items.


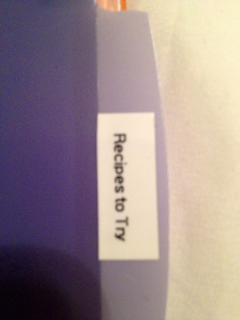
The next tab is for all of my recipes. This is were I will store the recipes I have chosen to use for the current season. I don't know how many times we have gone to make a recipe for the holiday and cant find it, have to call around to our family and search for the recipe. I finally have a written copy of all the important recipes and now have a place that I know I can find them. I want to store only the recipes I know for a fact I will use for the current holidy in this section. I will store all other recipes in the next tab. I can move them back and forth accordingly.


The last tab is for all the recipes I would like to try, either for this holiday possibly or save for next year. I have found tons of recipes on Pinterest, off of food channels on tv, from blogs, or just from other friends or family that sound perfect for the Thanksgiving holiday. But sometimes the stack of these new recipes gets lost and jumbled up and then I end up forgetting about them and never getting a chance to try them out. Now, just like with my very important recipes, they have a place too.

In the back of the binder I put this pocketed file. I can store photos, receipts, or any other misc. items that don't fit into any certain category but that I need to hold on to for any important reason.

So there you have it folks. My new Thanksgiving Binder. I cannot tell you how good of a feeling it is to be organized during the holidays and know that I have everything in one place. No more hunting down all the recipes, forgetting what I need to buy, not knowing for sure who is coming and if I will have enough food. Everything is covered. And, I have room to improve. I know this binder will just get better every year as I add more to it and as it evolves to fit our needs from year to year. I hope this inspires you to make one for yourself. And if you don't like my tabs, find what works for you and what would help you to stay organized for your own needs. I cant believe Thanksgiving is just over a week away! I hope everyone has the best of Holidays with their loved ones!! Happy Thanksgiving!!
P.S. I also plan on making a Christmas Binder! Check back soon!! I plan on tackling that this week :)
Friday, October 19, 2012
Weightloss! Oh boy......
I have a blog?.....oh yeah! I cant believe I let so much time go by without annoying you lovely folks with all these crazy details in my life (that I'm sure you find obnoxious but that I just feel I MUST share with the world :-) ). I honestly started this blog before I ever imagined my life being this crazy, but isn't that what we always say. Its easy to just blame our lack of motivation on "not enough time" and yet we (and by we I mean I) never seem to get anything accomplished.
So, since its been ages since my last posts, I thought what better way to get back into the swing of things than to start blogging my dieting process. I know, I know....If you have seen one weight loss blog then you have seen them all right?! Well, rest assured, this catalog of blogs to follow will probably contain nothing special from the rest. However, I feel it might help me stay more accountable. After a recent trip to the doctor with not so happy results and not to mention the fact that I am obviously overweight, I have decided that my life and my health are too important to me to let my current weight situation continue any longer.
Now, even though I haven't always been overweight, I have however struggled with weight off and on for roughly the last 10 years or so. A roller coaster ride of weight gain and loss. Once I became pregnant with my daughter in 2008, I gained about 50 lbs and by the time she was born I weighed about 170. The normal stress and chaos of new parenthood left me to gain an additional 30 pounds and now I am at a somewhat steady 208! Holy cow did I just announce that to the world?! Heck yes I did. And while I'm not proud of that number, I do know that many of us struggle with weight and that if I am going to take this serious then I cant sit back and let a silly number be something I'm afraid of. Its no one fault but my own that I am the size that I am. I like food.....and cake.....and dr.pepper.....so sue me!?! I'm sure you do too lol. And those are all things that are leaving my life for a while......cue the funeral music....
My goals for this weight loss journey are to set small achievable goals for myself. One thing at a time. I just started this past week with working on cutting back on my very serious Dr.Pepper addiction. Were talking 2-3 large size McDonald's cups worth a day, YIKES! While the first couple days were rough, it seems I have made it through that rough patch and are not having the huge head ache withdraws. I cannot quit the caffeine cold turkey so I have switched to limiting my self on sweet and unsweet tea while drinking as much water as I can. Now that I'm over that hump, my mail goal is to cut out processed foods, fast foods, fried foods, sugars and starches with be limited and moderated......that's a mouth full!
As far as my blogging goals, I plan to check in once a week with updates on my progress, my mess ups, pretty much any thoughts or interesting stuff about this whole process. It honestly scares me to death to attempt this because when it comes to dieting of any sort, I ALWAYS fail! I have to stay strong and keep the end result and big picture in my head. I CAN do this! I WILL do this! I have faith in myself that it can be done. Now, to just keep my but in gear! Wish me luck!
Friday, August 10, 2012
Back to School!
Okay, for starters I just want to say, that yes....I do blog...i'm just not the best at it! Forgive me for the lack of postings. It was a crazy busy summer and we enjoyed every second of it! But now the fun of summer is over and its off to a different kind of fun....Back to school! This year is a very big year, at least for me in our household. Gracie started Preschool today and just like every milestone she approaches, I took it very seriously! In our home we have many traditions, some of them old, and some new ones. Going back to school is one of those times a year for traditions for us!
Now, of coarse, we did the typical back to school shopping for clothing, supplies, and the BEST princess back-pack ever! But since the discovery of Pinterest (which by the way has only helped me in being an even more awesome mom in my daughters eyes lol) I have found a couple different things that I wanted to try this school year to see how they went.


Now, of coarse, we did the typical back to school shopping for clothing, supplies, and the BEST princess back-pack ever! But since the discovery of Pinterest (which by the way has only helped me in being an even more awesome mom in my daughters eyes lol) I have found a couple different things that I wanted to try this school year to see how they went.
Our back to school morning started off with a visit from the Back to School Fairy!

She brought Markers, Coloring pages, stickers, snacks, new princess pencils, ring pops, and a couple other little treats. She also left a note to send good wishes and even sent a "Hello" from George, our Elf on the Shelf!

Gracie wanted to take her teacher a "cake" as she requested. And since that would be rather difficult to transport, we compromised on a loaf of cream cheese cake (which is to dye for BTW, and you can find the recipe here)

This year I let Gracie have full control over her out fit, and I think she did very well!

She looks happy in these pictures, but trust me, in between photos she was yelling at me that it was time to go!! I guess I couldn't put it off much longer...

Overall, I'm just very excited, sad, proud, sad, happy.....did I mention sad?! Education is the most important gift to give a child and it makes me so happy that she loves school so much! I'm sad that she is growing up and needs me less and less every day. On a bright note, her teacher seems Awesome and I am going to try and be involved as much as I can! So here's to hoping everyone else is having great first days back at school and I look forward to seeing where this school year takes us!!
Wednesday, April 18, 2012
Ice Cream in a Bag
Its been an extremely long time since Ive posted, so what better way to reconnect with everyone than with an activity you can do with you kids that is both educational (hey, you can call it "science" lol) and entertaining while also being very yummy!! Did I just hear someone say they wanted a party in their tummy?? I seriously watch to much Yo Gabba Gabba.....
Okay, so I know that I am a mommy to an almost four year old, however, there are STILL things I am just recently learning that just make me think "WHY did I not know this before?!" Needless to say, this may not be something new for you. I just may in fact be the last person on the planet to have learned this. But if you are like me and had no clue you could do this then this recipe is just for you!! I found this scavenging the Internet for something quick and fun to do with my daughter outside today before her nap. It had to be quick, mess free (its sorta mess free.....), and I had to have everything needed to complete this task. This activity fit the bill!! Here is how simple it is to make homemade ice cream in a bag in just about 5 minutes!! No Joke!!
**Disclaimer! I was way to involved in the making of this activity to stop and photograph the process, which I wish I had, so the following pictures are not my own :-)
First you need to gather your ingredients!

Milk, Sugar, and Vanilla.
You can vary how much of each ingredient you use. Since Gracie and I each wanted our own little bit of ice cream, I made each recipe twice. For one person to have a small amount, I recommend using (per person) 1 cup of milk, 3 table spoons sugar (we like it sweet people!), and 1 table spoon of vanilla and just a tiny tiny pinch of salt.
Now, this is where you could talk to your kids about how we measure, let them poor the ingredients into the bag, talk to them about the flavors and what each one might taste like inside the ice cream. Ask them questions and get their brains movin!
In a small Ziploc bag, place your cup of milk, sugar and vanilla and use a spoon to mix gently. Seal the bag very tightly and try to get as much of the air out as you can so it doesn't pop later in the process.
In a Large zip lock back, place about 3 cups of ice. You want to fill the bag about half way of Ice. Next place about 6 tablespoons of rock salt into the Ice bag and give the bag a little shake to evenly distribute the salt into the ice. We were out of rock salt so I used a half and half mixture of kosher salt and table salt. This worked just fine! This is what you should have in front of you at this point.....

Now, just place your sealed bag of milk mixture into the ice bag and seal the ice bag very tightly.
I recommend going outside for this next part. Once your outside you want to shake the bag and move it around as much as you can for a few minutes. Basically moving the ice around the ice cream mixture as much as you can. Your child's hands will probably only be able to handle it for a few seconds because the bag gets VERY cold. After only a few minutes you will be able to feel the ice cream mixture and tell that it is now a soft ice cream texture. Once its firm enough its done! Just take it back in side, poor the ice cream in a bowl and enjoy!

Tuesday, January 17, 2012
Magnet Make-up Board, another Pinterest inspiration!
So here we are, yet again. Another Pinterest inspiration. I actually had intention of posting this a LONG time ago right after I had made this. But, as you know, time slipped away from me. It was October so the hustle and bustle of the holidays was right within grasp as well as finals and just the normal craziness that happens from October-Jan for just about everyone! My cousin turned 15 in early October and I struggled with what to get her. I have lately turned to making gifts for people since its a lot cheaper, you can give something one of a kind, and with all the fabulous ideas on Pinterest, it gave a crafty person like me a reason to try something new!

This was actually so easy to make! I did supply her with magnets so that if she wanted to use it as a make-up board she could, but she could also use it for what ever needs she found suited her best. I just thought it turned out funky and fun and just perfect for her! Here is the process of how I made this magnet board:
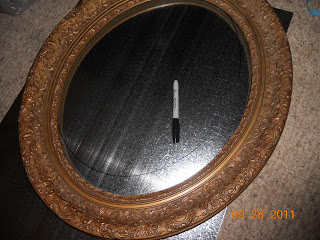
First, I found a cheap frame at the thrift store that had great shape and an awesome design in the molding. Its obviously an ugly frame but it had great potential! I only paid $4 for the frame!! WooHoo!!


Here was my inspiration:
 |
| Found on Pinterest via LauraThoughts81.blogspot.com |
Here is what I came up with:

This was actually so easy to make! I did supply her with magnets so that if she wanted to use it as a make-up board she could, but she could also use it for what ever needs she found suited her best. I just thought it turned out funky and fun and just perfect for her! Here is the process of how I made this magnet board:
First, I found a cheap frame at the thrift store that had great shape and an awesome design in the molding. Its obviously an ugly frame but it had great potential! I only paid $4 for the frame!! WooHoo!!

Then I had to find something that the magnets could stick to that was light enough to work with. So, the best thing I could find was this Galvanized Flashing. I'm not sure what the actual use for this is, however it was inexpensive and was perfect for what I needed it for. The roll cost about $13 however, there is enough flashing here for me to do about 20 more smaller frames. Needless to say this was a purchase that will come in handy for many other projects down the road. I would say I used about $2 worth of the product, roughly.

Next I just traced out what I needed, then painted the frame a shiney black color.


Now, I didn't want the metal to show so I found some fabric that was on sale at Walmart that I thought would really "pop" in her room. If you have seen my daughters bright neon green walls in her bedroom, then you would be familiar with my cousins walls as its the exact same green color. I felt this pink cheetah fabric, that I only paid $1.20 for, would really work well against the green!


The hardest part of this whole project was finding a way to attach the fabric covered metal piece to the frame so that it would hold. I tried hot glue, super glue, just about 5 different glues I could find around my house. It finally held but lets just say the back is something left to be desired lol. Lucky it wont get seen and all you will see is the fabulous front! It turned out to be a hit and she loved it! I'm thinking of making myself one for the kitchen to keep track of notes, school papers, and reminders. Hope everyone is having a great weekend!

Subscribe to:
Posts (Atom)